 Installation & Licensing Center
HOW TO - Troubleshoot Windows Update Errors
 Authored by Caleb Scharf
April 5th, 2023
10039 views
0 likes
Authored by Caleb Scharf
April 5th, 2023
10039 views
0 likes
 KB1224846
Description
In addition to not receiving important Security, Bug and Performance fixes, if Windows updates are not installing properly, this can indicate that your Windows Installation is not healthy. If your Windows installation is not healthy, this underlying problem can cause Ansys and other application not to function properly.
The steps in this article should help with all Windows Update errors and other issues that are important to ensuring your Windows Installation is working properly.
As an example, here are some commonly seen Windows update error codes: 0x80240034; 0x8007000E, 0x80242006, 0x80244018, 0x80D02002, 0x80246017, 0x80240438, 0x80070070, 0x8007000D, 0x80246008, 0x80096004, 0x80070020.
Solution
After performing each step, attempt to Check for Windows updates again.
- Windows Search > search and select Check for Updates > select Check for Updates
#1 - Run Windows Update Troubleshooter
- Windows Search > search for and select Troubleshoot Settings > Additional troubleshooters.
- Next, under Get up and running, select Windows Update > Run the troubleshooter.
- Check for Windows Updates.
#2 - Verify Free Space
Make sure that your device has enough space. You need at least 20GB of free space on your C-Drive for Windows updates to install properly.
If your PC is running low on storage and need help freeing up space, follow the section below called Cleanup System Files.
#3 - Update System Drivers
- If you have a Dell computer, this is best done by running the Dell Command Update application.
- If you have a Microsoft surface computer, this is traditionally done via Windows updates and you will need to proceed to the next step.
- If you have another computer manufacture, you will need to visit their support site for updated drivers and firmware.
#4 - Manually Update Windows
- Download and run the appropriate Windows Update/Installation Assistant for your version of Windows. Make sure you download the Update/Installation Assistant and NOT the installation media.
- Windows 10 - Click Here
- Windows 11 - Click Here
#5 - Check Device Manager for Errors
- Windows Search > search for and select device manager.
- In the window that appears, look for any device with a yellow exclamation mark next to it.
- Right click those devices > select Uninstall.
- Restart your computer > re-open the device manager > Verify there are no devices with a yellow exclamation mark next to it.
- Check for Windows Updates.
#6 - Cleanup System Files
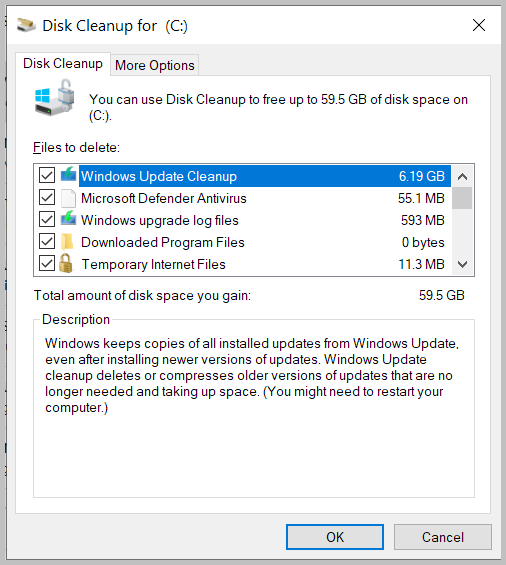
Cleaning up System Files with the Disk Cleanup utility will clear your recycle bin along with many other temporary system files that can sometimes cause issues.
- Windows Search > search for and open Disk Cleanup > Select the (C:) drive > click OK.
- Select Cleanup System Files > Select the (C:) drive > click OK.
- Scroll the entire list and check all boxes > click OK.
-
This process may take some time...
- Restart your computer and Check for Updates.
#7 - Reset Software Distribution Folders
Performing these steps will clear the folders where windows downloads and stores update files. Clearing these folders can fix corrupted files that may be causing the issue.
- Windows Search > search for Command Prompt > Right click it and select Run as Administrator.
- Copy, paste and run the following commands.
net stop wuauserv
rd /s /q %systemroot%\SoftwareDistribution
net start wuauserv
- Check for Windows Updates. Continue to the next step, if they continue to fail.
- In an Administrator command prompt, copy and paste and run the following commands.
net stop bits
net stop wuauserv
net stop cryptsvc
net stop usosvc
net stop osrss
ren %systemroot%\softwaredistribution softwaredistribution.bak
ren %systemroot%\system32\catroot2 catroot2.bak
ren %Systemroot%\SoftwareDistribution\Download Download.bak
ren %Systemroot%\SoftwareDistribution\DataStore DataStore.bak
- Restart your computer.
- Check for Windows Updates. If Windows Updates fail again, follow the manual reset process in this Microsoft article:
#8 - Verify & Repair Windows System Files
- Follow the article, Check and Repair Windows Installation.
- Restart your computer.
- Check for Windows Updates.
#9 - Disconnect All External Hardware Devices
- Disconnect all external hardware devices and peripherals.
- Restart your computer.
- Check for Windows Updates
#10 - Perform a Clean Boot
A “clean boot” starts Windows with a minimal set of drivers and startup programs, so that you can determine if another non-mandatory service/application is part of the cause.
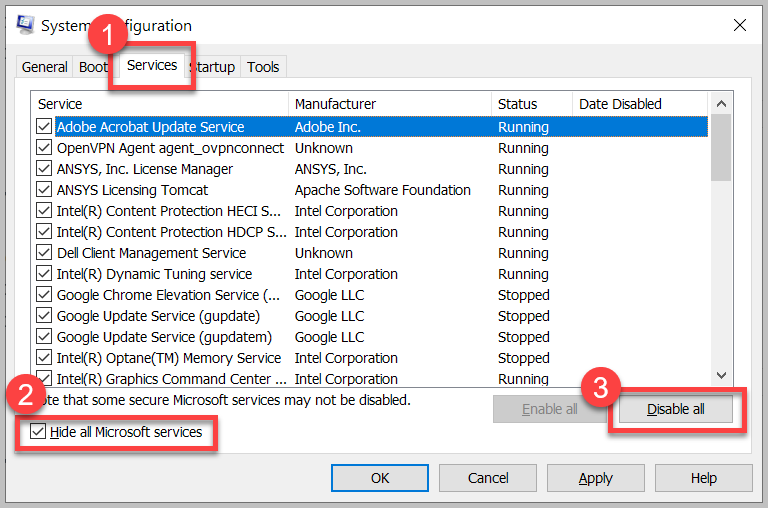
- Windows Search > search for and open System Configuration.
- On the Services tab > check Hide all Microsoft Services.
- Make note of any services that are already unchecked so that when you re-enable all these services later, you can disable them again.
- Select Disable all > Select Apply.
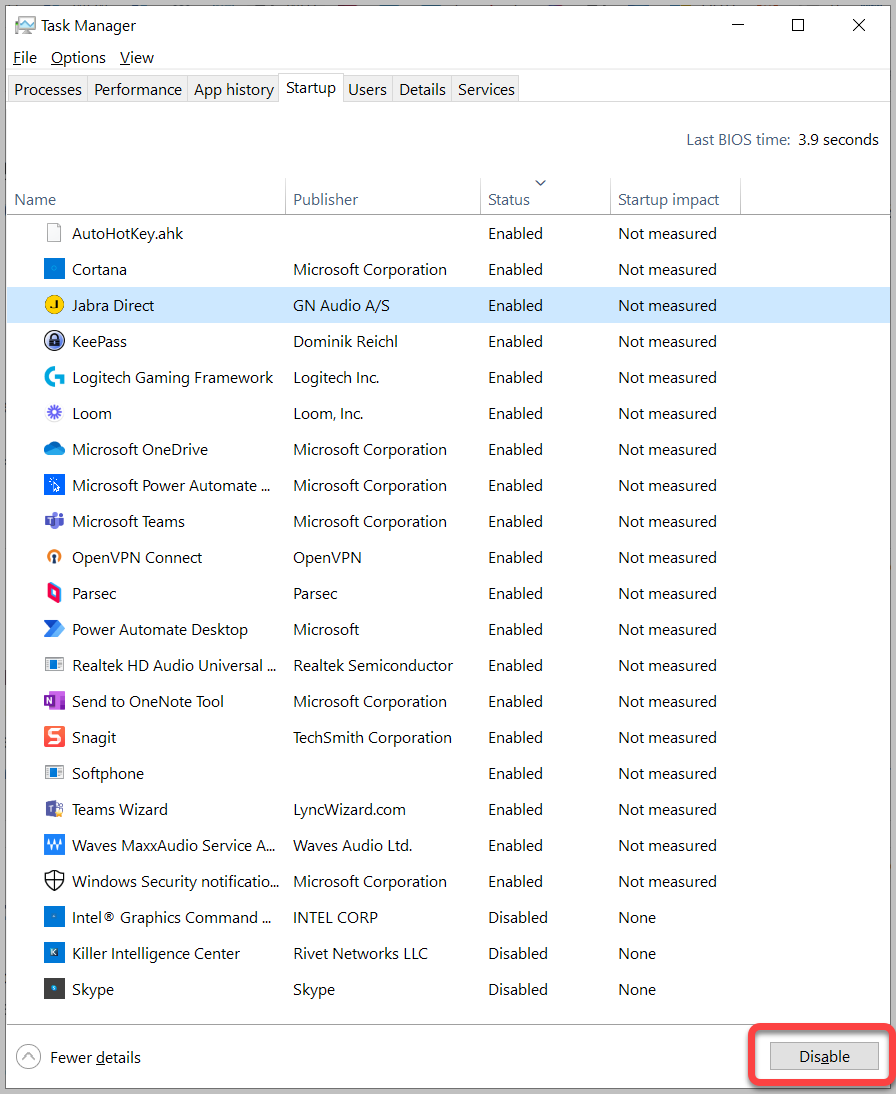
- On the Startup Tab select Open Task Manager.
- Make note of all applications that are already disabled so that when you re-enable these services, you leave them disabled.
- Disable all items that have a status of Enabled. This must be done one by one.
- Restart Windows and Check for Windows Updates.
- Did Windows Updates install correctly?
- YES
- This means that one of the disabled services was interfering with the process.
- Repeat the steps above and re-enable all services and applications that were disabled.
- Restart Windows.
- If you experience problems with Windows Updates again, you will need to perform this same process over again, disabling only select services at a time before trying to repeat the problem. This will allow you to isolate the problem to a specific service/application.
- NO
- This means the problem lies elsewhere.
- Repeat the steps above and re-enable all services and applications that were disabled.
- Restart Windows.
- YES
*Some of this content was taken from this Microsoft Article.